Frigate NVR Docker, in a Hyper-V VM with a virtualized/partitioned GPU
The following is a quick dump of what I did to get a Frigate docker container running inside a Ubuntu 22.04 LTS VM hosted on my Hyper-V server. The VM has access to & shares the hosts GPU, an Intel ARC A380. I’ve combined these steps from a few different places including: Easy-GPU-PV, a Reddit thread and a Github gist. I’ve not gone into great detail on some of the steps – ie, I assume you know how to admin a Linux VM & transfer files to it etc.
Start an elevated Powershell console. Run the following to find out if you have any GPU’s capable of virtualization:
Get-WmiObject -Class "Msvm_PartitionableGpu" -Namespace "ROOT\virtualization\v2"
If nothing is returned, you will not be able to continue. Create a new Hyper-V VM, generation 2, turn off Secure Boot & Dynamic Memory. I’ve named my VM “Frigate”. Run the following Powershell commands to add a virtual GPU to the VM and start it up:
$vm ="Frigate"
Remove-VMGpuPartitionAdapter -VMName $vm
Add-VMGpuPartitionAdapter -VMName $vm
Set-VMGpuPartitionAdapter -VMName $vm -MinPartitionVRAM 1
Set-VMGpuPartitionAdapter -VMName $vm -MaxPartitionVRAM 11
Set-VMGpuPartitionAdapter -VMName $vm -OptimalPartitionVRAM 10
Set-VMGpuPartitionAdapter -VMName $vm -MinPartitionEncode 1
Set-VMGpuPartitionAdapter -VMName $vm -MaxPartitionEncode 11
Set-VMGpuPartitionAdapter -VMName $vm -OptimalPartitionEncode 10
Set-VMGpuPartitionAdapter -VMName $vm -MinPartitionDecode 1
Set-VMGpuPartitionAdapter -VMName $vm -MaxPartitionDecode 11
Set-VMGpuPartitionAdapter -VMName $vm -OptimalPartitionDecode 10
Set-VMGpuPartitionAdapter -VMName $vm -MinPartitionCompute 1
Set-VMGpuPartitionAdapter -VMName $vm -MaxPartitionCompute 11
Set-VMGpuPartitionAdapter -VMName $vm -OptimalPartitionCompute 10
Set-VM -GuestControlledCacheTypes $true -VMName $vm
Set-VM -LowMemoryMappedIoSpace 1Gb -VMName $vm
Set-VM -HighMemoryMappedIoSpace 32GB -VMName $vm
Start-VM -Name $vm
Next, I’ve installed the OS, in my case I’ve chosen a minimal install of Ubuntu 22.04 LTS, with just OpenSSH added at this point. Once Ubuntu has been installed and is up and running, we need to custom compile the Microsoft dxgkrnl module from their WSL2 repository. In the VM, login as root and run the following:
uname -rThis will return the running kernel version and the branch we need to get the WSL2 kernel module for:

Next, we download and compile the kernel module. This is easy, thanks to a script I found here: https://gist.github.com/krzys-h/e2def49966aa42bbd3316dfb794f4d6a?permalink_comment_id=4670645. The script needed to be updated to match the kernel branch we’re currently running, eg:
#!/bin/bash -e
BRANCH=linux-msft-wsl-5.15.y

if [ "$EUID" -ne 0 ]; then
    echo "Switching to root..."
    exec sudo $0 "$@"
fi

apt-get install -y git dkms

git clone -b $BRANCH --depth=1 https://github.com/microsoft/WSL2-Linux-Kernel
cd WSL2-Linux-Kernel
VERSION=$(git rev-parse --short HEAD)

cp -r drivers/hv/dxgkrnl /usr/src/dxgkrnl-$VERSION
mkdir -p /usr/src/dxgkrnl-$VERSION/inc/{uapi/misc,linux}
cp include/uapi/misc/d3dkmthk.h /usr/src/dxgkrnl-$VERSION/inc/uapi/misc/d3dkmthk.h
cp include/linux/hyperv.h /usr/src/dxgkrnl-$VERSION/inc/linux/hyperv_dxgkrnl.h
sed -i 's/\$(CONFIG_DXGKRNL)/m/' /usr/src/dxgkrnl-$VERSION/Makefile
sed -i 's#linux/hyperv.h#linux/hyperv_dxgkrnl.h#' /usr/src/dxgkrnl-$VERSION/dxgmodule.c
echo "EXTRA_CFLAGS=-I\$(PWD)/inc" >> /usr/src/dxgkrnl-$VERSION/Makefile

cat > /usr/src/dxgkrnl-$VERSION/dkms.conf <<EOF
PACKAGE_NAME="dxgkrnl"
PACKAGE_VERSION="$VERSION"
BUILT_MODULE_NAME="dxgkrnl"
DEST_MODULE_LOCATION="/kernel/drivers/hv/dxgkrnl/"
AUTOINSTALL="yes"
EOF

dkms add dxgkrnl/$VERSION
dkms build dxgkrnl/$VERSION
dkms install dxgkrnl/$VERSION
Reboot, and once back at a root shell, run “lsmod” – you should see “dxgkrnl” is now loaded.
Copy the Windows Direct-x 2 core files from the Hyper-V host, to the dxgkrnl lib folder in the virtual machine. Copy the contents of “C:\WINDOWS\System32\lxss\lib” on the host to “/usr/lib/wsl/lib/” on the VM (create the directory if necessary).
Next, we need to locate where the Windows GPU drivers are stored and also copy those to the VM. In the elevated Powershell window on the Host, run:
Get-WmiObject Win32_VideoController | Select InstalledDisplayDriversThis will reveal the folder where your drivers are located. Eg:

In my case, my Intel Arc A380 drivers are located in: C:\WINDOWS\System32\DriverStore\FileRepository\iigd_dch_d.inf_amd64_4f5c827882a7a7f5\
Copy this folder, all it’s contents recursively from the Host to “/usr/lib/wsl/drivers/” on the VM. Eg:

Run “chmod -R 0555 /usr/lib/wsl” to correct the file permissions. The above steps will need to be repeated whenever the display drivers on the Host are updated.
Run the following commands:
ln -s /usr/lib/wsl/lib/libd3d12core.so /usr/lib/wsl/lib/libD3D12Core.so
echo "/usr/lib/wsl/lib" > /etc/ld.so.conf.d/ld.wsl.conf
ldconfig
Reboot the VM and log back in as root. Run the following commands:
lspci -v # This should show you the virtual video card & the driver it's using
ls -al /dev/dxg # This should exist and is used to communicate with the GPU

apt install vainfo mesa-va-drivers
export LIBVA_DRIVER_NAME=d3d12
export MESA_LOADER_DRIVER_OVERRIDE=vgem
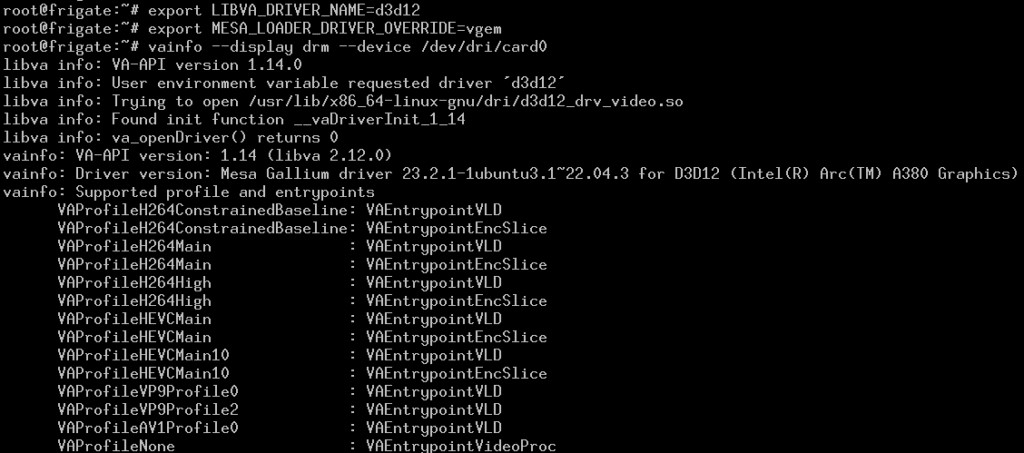
vainfo --display drm --device /dev/dri/card0
As long as vainfo can see the video card, we can proceed with installing a Frigate docker container. Run the following:
apt install apt-transport-https ca-certificates curl software-properties-common
curl -fsSL https://download.docker.com/linux/ubuntu/gpg | gpg --dearmor -o /usr/share/keyrings/docker-archive-keyring.gpg
echo "deb [arch=$(dpkg --print-architecture) signed-by=/usr/share/keyrings/docker-archive-keyring.gpg] https://download.docker.com/linux/ubuntu $(lsb_release -cs) stable" | tee /etc/apt/sources.list.d/docker.list > /dev/null
apt update
apt install docker-ce docker-compose-plugin
Next, I’ve created a docker-compose.yml file containing the basic docker template from the Frigate install guide, with a couple of tweaks to load the GPU drivers:
version: "3.9"
services:
  frigate:
    container_name: frigate
    privileged: true
    restart: unless-stopped
    image: ghcr.io/blakeblackshear/frigate:stable
    shm_size: "128mb"
    group_add:
      - "109"
    devices:
      - /dev/dri/card0:/dev/dri/card0
      - /dev/dri/renderD128:/dev/dri/renderD128
      - /dev/dxg:/dev/dxg
    volumes:
      - /etc/localtime:/etc/localtime:ro
      - /opt/frigate/config:/config
      - /opt/frigate/storage:/media/frigate
      - /usr/lib/wsl:/usr/lib/wsl
      - type: tmpfs
        target: /tmp/cache
        tmpfs:
          size: 1000000000
    ports:
      - "8971:8971" # Main UI
      - "5000:5000" # Internal unauthenticated access. Expose carefully.
      - "8554:8554" # RTSP feeds
      - "8555:8555/tcp" # WebRTC over tcp
      - "8555:8555/udp" # WebRTC over udp
    environment:
      LIBVA_DRIVER_NAME: "d3d12"
      MESA_LOADER_DRIVER_OVERRIDE: "vgem"
      LD_LIBRARY_PATH: "/usr/lib/wsl/lib"
Running “docker compose up -d” will download the container templates and fire up a new Frigate docker instance. Don’t forget to run “docker logs frigate” to see what admin password was created!
Run the following command to see if the docker container can also see & load the GPU drivers:
docker exec -ti frigate vainfo --display drm --device /dev/dri/card0To ensure that Frigate runs ffmpeg with the correct path to access the card, update the Frigate config with the following:
ffmpeg:
  hwaccel_args: -hwaccel vaapi -hwaccel_device /dev/dri/card0
I am also running Openvino on the GPU to perform object detection with the following piece of config:
detectors:
  ov:
    type: openvino
    device: GPU

model:
  width: 300
  height: 300
  input_tensor: nhwc
  input_pixel_format: bgr
  path: /openvino-model/ssdlite_mobilenet_v2.xml
  labelmap_path: /openvino-model/coco_91cl_bkgr.txt
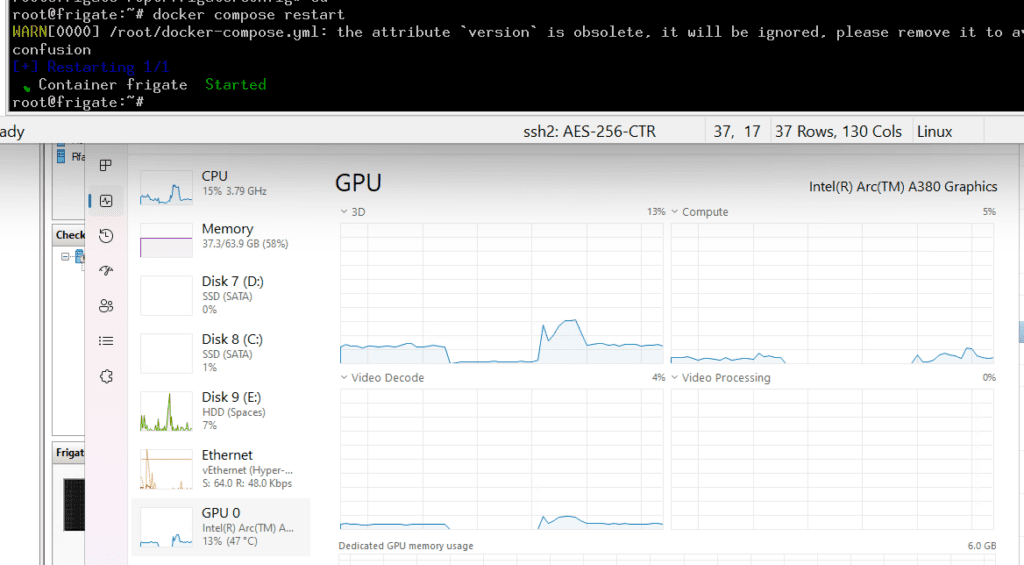
You should be good to go! Once you have some cameras added to the config you should see some load on the GPU. I can’t yet figure out how to access the GPU stats from inside the VM, but you can see the load in task manager on the host itself when I stop/start the docker container:

Enjoy!